Heating a home with a rocket stove is a sustainable and efficient option, especially in off-grid or emergency situations. Rocket stoves are designed to burn small pieces of wood or other biomass fuel cleanly and generate a significant amount of heat. Here’s a general guide on how to heat a home with a rocket stove:
Choose the Right Rocket Stove:
Select a rocket stove suitable for indoor use. There are specially designed rocket stoves for heating purposes, often referred to as “rocket mass heaters” or “rocket heaters.” These stoves are more efficient and emit less smoke indoors.
Install the Rocket Stove:
Proper installation is crucial for safety and efficiency. The stove should be placed in a well-ventilated area near an exterior wall to allow for a chimney installation.
Install a Chimney:
A chimney is necessary to vent the smoke and gases produced by the rocket stove safely outside. It should extend through the roof of your home. It’s essential to follow local building codes and regulations when installing a chimney.
Provide Adequate Airflow:
Rocket stoves require a source of fresh air for combustion. Ensure there is proper ventilation to provide oxygen to the fire and prevent the accumulation of carbon monoxide indoors.
Fuel the Stove:
Use small pieces of dry wood or other suitable biomass fuel to fuel the rocket stove. Hardwood, like oak or maple, is an excellent choice because it burns slowly and provides consistent heat.
Ignite the Fire:
Use a long lighter or matches to ignite the kindling inside the combustion chamber of the rocket stove.
Monitor and Adjust the Fire:
As the fire burns, monitor the temperature and adjust the airflow or fuel supply as needed to maintain the desired indoor temperature. Rocket stoves are known for their efficient heat output, so a little fuel goes a long way.
Heat Distribution:
To distribute the heat throughout your home, you can use a system of fans or ducts. Some rocket mass heaters incorporate a “heat bench” or thermal mass to store and release heat slowly, providing a more even and extended heating effect.
Safety Precautions:
Keep safety in mind at all times. Place a fireproof barrier around the rocket stove to prevent accidental contact. Install carbon monoxide detectors in your home to ensure early detection of any issues with ventilation.
Extinguish the Fire:
When you no longer need heat, let the fire burn down to embers and cool before extinguishing it completely. Close the damper or flue to prevent drafts and heat loss.
Or Build Your Own Rocket Stove
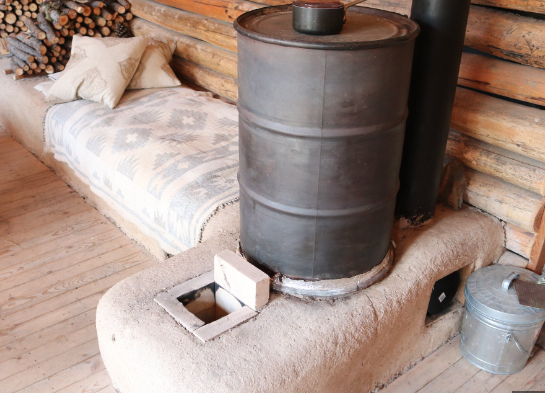
Building a thermal rocket stove using mud, also known as a rocket mass heater, can be a cost-effective and sustainable way to heat your home. This type of stove is designed to maximize heat efficiency and minimize fuel consumption. Here’s a simplified guide on how to construct a basic thermal rocket stove using mud:
Materials Needed:
- Empty large steel or metal barrel (for the combustion chamber)
- Clay-rich soil or subsoil (for making cob, a mixture of clay, sand, and straw)
- Sand
- Straw or other natural fiber (for reinforcement)
- Empty cans or bottles (for creating the heat riser)
- Metal or ceramic pipes (for the exhaust system)
- Fireproof bricks or stones (optional, for a thermal mass bench)
Construction Steps:
Prepare the Foundation
– Choose an appropriate location for your rocket stove, near an exterior wall where you can install a chimney. Ensure there is proper ventilation. *7. Add a Base:**
– Place a few bricks or stones on the ground to create a stable base for your rocket stove.
Construct the Inner Core
– Use a straight, cylindrical container as a mold for the inner core of your rocket stove. Pack the clay mixture into the mold, ensuring it’s tightly packed and smooth on the inside.
Create the Outer Shell
– Use a larger cylindrical container to mold the outer shell of the rocket stove. This will create a space between the inner core and outer shell for insulation.
Build the Top Surface
– Cut a flat piece of wood or plywood to fit the top of the rocket stove. This will serve as the cooking surface. Ensure it fits securely on top of the outer shell.
Assemble the Stove
– Place the inner core into the larger outer shell. Use some of the clay mixture to seal the gap between the two, creating a snug fit. You will need a Heat Riser.
What is a Heat Riser?
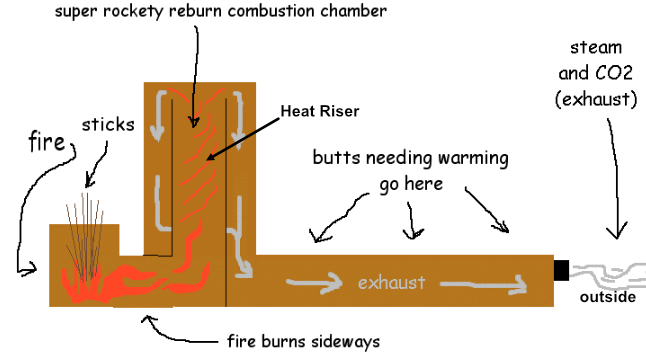
A heat riser, also known as a heat riser tube or vertical combustion chamber, is a crucial component of a thermal mass rocket stove. It plays a significant role in the stove’s efficiency and the distribution of heat. Here’s a brief explanation of what a heat riser is and its function:
Definition:
– A heat riser is a vertical tube or chamber located within the rocket stove’s combustion unit. It typically extends from the firebox, where the fuel is burned, to a point above the stove’s horizontal mass, where the heat is collected and radiated.
Function:
The primary function of the heat riser is to create a strong upward draft of hot gases and combustion byproducts. This upward draft is a fundamental aspect of rocket stove design and is responsible for efficient combustion and heat transfer.
How It Works:
As fuel burns in the firebox, hot gases and smoke are generated. These gases are directed into the heat riser, where they become superheated due to the narrow, insulated space. The heat riser tube is typically insulated to maintain high temperatures. This superheating creates a strong convection current, pulling in more air from the firebox and ensuring complete combustion of the fuel.
Improved Efficiency:
The heat riser’s design and insulation allow it to reach extremely high temperatures, often exceeding 1,000 degrees Fahrenheit (540 degrees Celsius). This high temperature ensures that most of the fuel is burned efficiently, reducing emissions and minimizing creosote buildup, which can be a problem in traditional wood stoves.
Heat Transfer:
The hot gases and combustion byproducts then exit the heat riser and are directed through a horizontal mass, such as a cob bench or a masonry structure. This mass absorbs and stores the heat, gradually releasing it into the living space. The extended heat transfer process allows for a longer-lasting and more consistent heat output compared to conventional stoves.
In summary, a heat riser is a critical component of a thermal mass rocket stove that creates a powerful convection current, ensuring efficient combustion and excellent heat transfer. It contributes to the stove’s eco-friendly and efficient performance, making it an attractive option for heating and cooking in off-grid and sustainable living scenarios.
Mix Cob for a Stove:
Mix clay-rich soil or subsoil with sand and straw to create a cob mixture. The ideal ratio is approximately 3 parts soil, 1 part sand, and 1 part straw. Add water gradually until you achieve a workable, dough-like consistency.
Construct the Rocket Mass Heater:
Begin applying the cob mixture around the outside of the combustion chamber (the barrel). Build up the walls, leaving the heat riser exposed and ensuring it’s sealed well to prevent air leaks.
Form the Exhaust System:
Extend metal or ceramic pipes from the top of the combustion chamber to create an exhaust system. The exhaust gases will travel up and out through these pipes, transferring heat to the thermal mass.
Thermal Mass Bench (Optional):
To increase heat storage and distribution, you can build a thermal mass bench near the exhaust pipes. Use fireproof bricks or stones to construct the bench and cob to seal and insulate it.
Finish and Cure:
Smooth the cob surface and let it dry and cure for several days or even weeks, depending on the size of your rocket mass heater. The cob will harden as it dries.
Install a Chimney
Install a chimney that connects to the exhaust pipes, directing the smoke and gases safely outside.
Test Your Stove
Once the rocket stove is completely dry, you can start using it for cooking or heating. Place fuel (small sticks, wood, or biomass) into the combustion chamber, ignite it, and enjoy the efficient and eco-friendly heat it provides.
Rocket mass heaters are highly customizable, and the design can vary based on your needs and preferences. Consider consulting with experienced builders or resources dedicated to rocket mass heater construction for more detailed guidance.
Building a thermal rocket stove using cob can be a rewarding DIY project, but it’s important to ensure that your stove is safe and complies with local building codes and regulations. Additionally, always exercise caution and proper fire safety practices when using any wood-burning stove or heater indoors.
Heating your home with a rocket stove can be an eco-friendly and cost-effective way to stay warm, especially in smaller living spaces. However, it’s essential to have a clear understanding of local building codes and safety regulations before installing and using a rocket stove indoors. Consulting with a professional or experienced installer can help ensure a safe and efficient heating solution for your home.
https://thehouseandhomestead.com/rocket-mass-heater/. Featured Photo source